Oh, what a nightmare it is to come home and find your window frame damaged after a break-in. It’s a truly unsettling experience, and your immediate concern is likely how to temporarily secure a broken window frame to protect your home and your peace of mind. While the shock and stress are undeniable, taking swift, practical steps can make a huge difference in re-establishing security and preventing further issues. This guide is designed to walk you through the process with a warm, empathetic approach, helping you navigate this challenging situation confidently. We’ll cover everything from initial safety precautions to effective temporary fixes, ensuring your home is safe until professional repairs can be made.
First Steps After the Incident
The moment you discover a broken window, your safety and the safety of your loved ones should be your absolute top priority. Before you even think about touching anything, ensure the immediate area is safe. If you suspect an intruder might still be present, do not enter your home. Retreat to a safe location and immediately contact your local police department. They will secure the scene, investigate, and ensure it’s safe for you to re-enter. This initial response is crucial, not just for your physical safety but also for the integrity of any potential evidence that might help authorities.
Once the police have cleared the scene and you’re given the go-ahead, your next step is to document everything meticulously. Use your phone to take clear photos and videos of the broken window, the damaged frame, and any other affected areas. This documentation will be invaluable when filing a police report and, more importantly, when submitting a claim to your home insurance provider. Don’t rush this process; capture every detail, no matter how small, as it could support your claim for necessary repairs. Remember to keep a calm head during this stressful time, focusing on these essential preliminary actions before moving on to any physical repairs.
Gathering Your Materials
Before you begin any temporary repairs, it’s essential to gather the right tools and materials to ensure the job is done safely and effectively. You’ll want sturdy plywood or OSB board, ideally at least 1/2 inch thick, cut to size to cover the entire window opening with a few inches of overlap on all sides. Other crucial items include a measuring tape, a pencil, a saw (if you need to cut the board yourself, though many hardware stores offer cutting services), a drill with appropriate bits, and screws that are long enough to securely fasten the board to the window frame without protruding too far inside.
Safety gear is non-negotiable when dealing with broken glass and damaged frames. Make sure you have heavy-duty work gloves to protect your hands from sharp edges, safety glasses to shield your eyes from debris, and sturdy shoes. A broom and dustpan, along with a thick trash bag or cardboard box, will be necessary for safely collecting and disposing of broken glass. Having these items on hand before you start will streamline the process and minimize the risk of injury, allowing you to focus on the task of making your home secure again.
Clearing the Area Safely
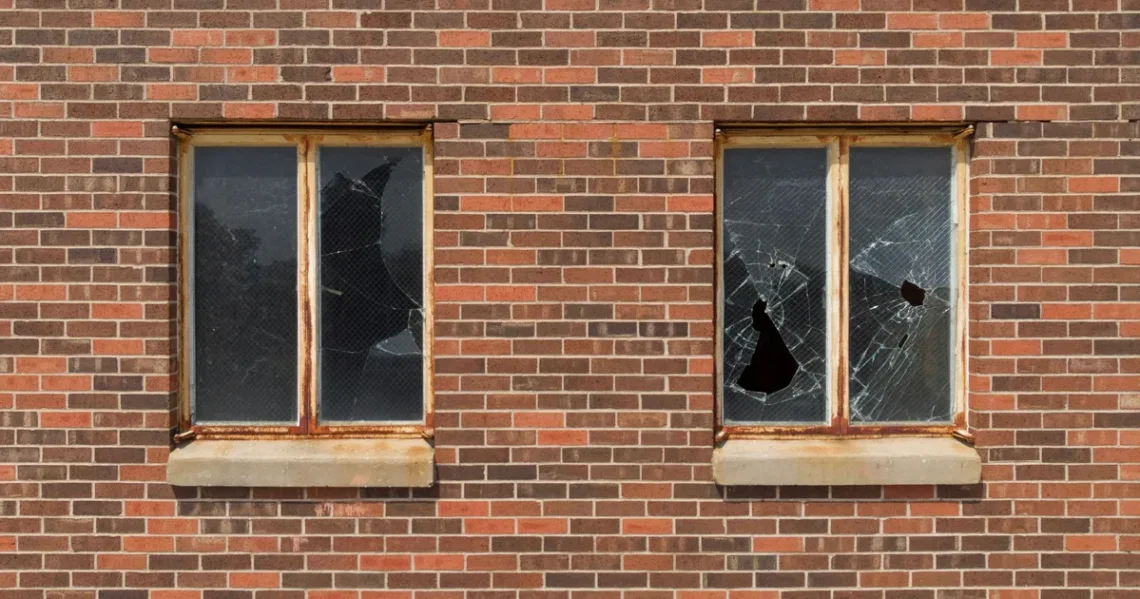
With your safety gear on and materials ready, the next critical step is to carefully clear the area of any remaining broken glass. Even small shards can pose a significant hazard. Begin by gently removing any loose pieces of glass from the window frame, placing them directly into your designated container for disposal. Avoid using your bare hands; always rely on your work gloves and tools like pliers or a putty knife to dislodge stubborn fragments. Be thorough, as unseen splinters can cause injuries later.
After clearing the immediate frame, use your broom and dustpan to sweep up any glass on the floor, both inside and outside the window. For very fine shards, a vacuum cleaner with a strong suction can be effective. Once the area is as clean as possible, carefully inspect the window frame itself for any structural damage beyond the broken glass. A compromised frame might require additional reinforcement before boarding up. This meticulous cleanup is vital for creating a safe working environment and ensuring the temporary repair can be applied effectively.
Boarding Up the Opening
Once the area is clear and safe, you can proceed with boarding up the window opening, which is often the most secure temporary solution. Measure the entire opening, including any damaged parts of the frame, and cut your plywood or OSB board to size, ensuring it overlaps the frame by at least 2-3 inches on all sides. This overlap provides a solid surface for attachment and helps seal the opening more effectively against the elements and potential intruders. If possible, consider adding a layer of plastic sheeting between the board and the frame for extra weather protection, especially if rain is expected.
Position the cut board over the exterior of the window opening, ensuring it is centered and covers the entire damaged area. Using your drill, pre-drill pilot holes through the plywood and into the sturdy parts of the window frame. These pilot holes prevent the wood from splitting and make it easier to drive in the screws. Space your screws every 6-8 inches around the perimeter of the board, driving them firmly until the board is flush and securely fastened against the house. This robust attachment is key to making your temporary fix truly effective until professional repairs can be arranged, ideally by early 2026.
Securing the Frame Itself
While boarding up covers the opening, it’s also important to address the broken window frame directly, especially if it’s severely compromised. If parts of the frame are splintered or loose, you can use heavy-duty duct tape or even smaller pieces of wood and screws to temporarily reinforce these areas. The goal here isn’t a permanent fix, but rather to stabilize the frame enough so that it can firmly support the plywood board and provide a more secure barrier.
For frames that have been significantly warped or detached from the wall, consider using a few longer screws to re-anchor them to the wall studs, if accessible and safe to do so. This extra step helps prevent the entire temporary structure from shifting or failing under pressure. Remember, these are stop-gap measures designed to hold things together until a professional can assess the full extent of the damage and perform a proper, lasting repair.
Alternative Temporary Solutions
While boarding up with plywood is generally the most robust method to temporarily secure a broken window frame, there are situations where other alternatives might be more practical or sufficient for a very short-term solution. For smaller breaks or cracks where the window pane is still largely intact but compromised, heavy-duty clear packing tape or specialized window repair tape can be used to hold fragments together and prevent further shattering. This method offers less security but can provide immediate weather protection.
Another option, especially for a large opening where plywood isn’t immediately available, is to use thick, heavy-duty plastic sheeting or tarpaulins. These can be taped over the opening, extending several inches beyond the frame, and then secured with strong duct tape or even staples to the surrounding wall or window trim. While this provides excellent protection against wind and rain, it offers minimal security against intrusion. It’s a good choice for overnight protection before you can get proper materials the next day. For truly effective security against future issues, investing in robust window security film is always a good idea, which can be applied to new windows installed in 2026.
Next Steps and Professional Help
Once your broken window frame is temporarily secured, take a deep breath – you’ve handled a tough situation admirably! Your next crucial step is to contact a reputable glazier or window repair specialist as soon as possible. Explain the situation, including the extent of the damage to both the glass and the frame, and provide them with the photos you took earlier. They can provide an accurate assessment, offer solutions for permanent repair, and give you an estimated timeline and cost. Getting professional eyes on the damage is essential, as hidden structural issues might exist that only an expert can identify and rectify.
Simultaneously, make sure to follow up with your home insurance company. Provide them with your police report number, photos, and any estimates from repair professionals. Understanding your policy coverage for break-ins and property damage is vital. They will guide you through the claims process and inform you about what expenses are covered. Remember, these temporary measures are just that – temporary. Prioritizing professional repair ensures the long-term security, energy efficiency, and aesthetic integrity of your home are fully restored. For more information on securing your home, you might consult resources like the National Fire Protection Association’s home security tips or Ready.gov’s advice on protecting your home.
Key Takeaways
- Prioritize safety first: Secure yourself and call authorities before touching anything.
- Document everything: Take photos and videos for police and insurance claims.
- Gather essential materials: Plywood, tools, and safety gear are crucial for a temporary fix.
- Clear the area safely: Remove all glass shards to prevent injury.
- Board up effectively: Secure plywood over the opening, overlapping the frame, using robust screws.
- Contact professionals: Schedule permanent repairs and file an insurance claim promptly.
Frequently Asked Questions
How quickly do I need to temporarily secure the window?
You should aim to temporarily secure the window as soon as it’s safe to do so after the police have cleared the scene. An unsecured opening leaves your home vulnerable to further intrusion, weather damage, and can be a safety hazard, so swift action is highly recommended.
Can I use heavy-duty plastic sheeting instead of plywood?
While heavy-duty plastic sheeting or a tarp can provide temporary protection against weather, it offers very little security against potential intruders. Plywood is the superior choice for security, but plastic can be a short-term solution if plywood is not immediately available.
What if the window frame itself is severely damaged?
If the window frame is severely damaged, you should still proceed with boarding up the opening using plywood. Additionally, try to reinforce the broken frame sections with strong tape or small wooden blocks before attaching the board. This provides more stability until a professional can assess and repair the structural damage.
Should I attempt a DIY permanent repair?
Unless you are a trained professional, it is generally not recommended to attempt a DIY permanent repair for a broken window frame after a break-in. Professional glaziers or carpenters have the expertise and tools to ensure the repair is safe, secure, and meets building codes, which is crucial for your home’s long-term integrity.
Will my home insurance cover the temporary repairs?
Most home insurance policies cover damages resulting from a break-in, including the costs associated with temporary securing measures and permanent repairs. It’s essential to contact your insurance provider immediately to understand your specific coverage and initiate the claims process. Keep all receipts for materials used.
Conclusion
Dealing with a broken window frame after a break-in is undoubtedly a distressing event, but by following these steps, you can effectively re-establish security and begin the recovery process. Remember to prioritize your safety, document everything thoroughly, and then move on to carefully clearing the area and securing the opening with robust materials like plywood. While these temporary measures are crucial for immediate protection, they are just the first step. Always reach out to professional repair services and your insurance provider promptly to ensure your home is fully restored to its safe and secure state. You’ve got this, and help is available to guide you through it.
- Mastering Home Repair Safety: Risk Assessment & Compliance Standards
- Hot Wall Switch? What To Do Immediately For Safety
- Quick Fix Guide: Temporarily Seal a Leaking Water Heater Drain Valve
- How to Contain Roof Leaks During Heavy Rain: Emergency Strategies
- Emergency Flat Roof Tarping: How to Prevent Water Pooling and Leaks