Learning how to repair loose roof flashing safely is a critical skill for homeowners looking to maintain their property’s structural integrity and prevent costly water damage. As we head into 2026, the demand for DIY home maintenance knowledge has surged, making it essential to understand the nuances of metal transitions on your roof. Roof flashing acts as a barrier at joints and intersections, such as chimneys and vents, where water is most likely to penetrate. When these components become loose or damaged due to wind or thermal expansion, your home becomes vulnerable to rot and mold. This guide provides a comprehensive roadmap for identifying problems and executing repairs without compromising your personal safety. By following industry-standard techniques and using the correct materials, you can extend the lifespan of your roofing system and ensure your interior stays dry during heavy storms.
Identifying Damaged or Loose Flashing Areas
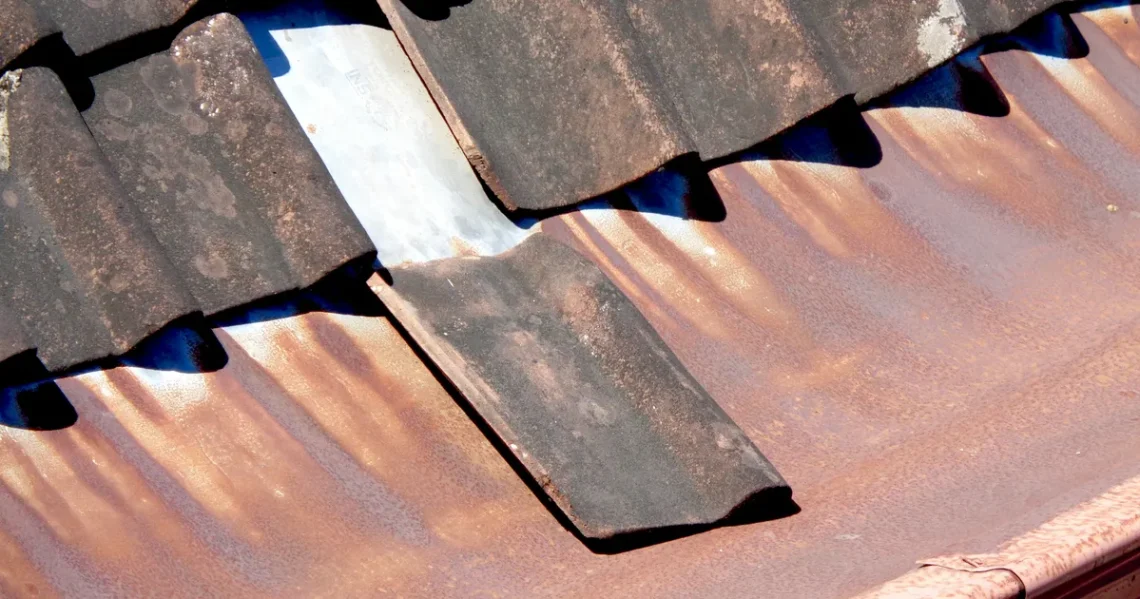
The first step in any successful repair is a thorough inspection of the roof’s most vulnerable points. Flashing is typically found around chimneys, dormers, skylights, and where roof planes meet in a valley. You should look for visible gaps where the metal has pulled away from the brick or shingles, as well as signs of rust or corrosion that could compromise the material’s strength. Often, the original sealant has dried out and cracked over time, allowing the metal to wiggle or lift during high winds. It is helpful to conduct this inspection after a light rain, as moisture patterns can highlight exactly where the water is bypassing the flashing and entering the sub-structure of the roof.
Beyond visual inspections from the ground or a ladder, you should also examine the interior of your attic for signs of failure. Water stains on the rafters or damp insulation near the chimney base are definitive indicators that your flashing is no longer performing its job. In 2026, many homeowners are using thermal imaging cameras to detect temperature variations that suggest hidden moisture behind walls. If you notice any of these signs, it is imperative to address the loose flashing immediately before the underlying wood begins to rot. Early detection not only saves money on materials but also prevents the need for a full roof replacement, which is significantly more expensive and labor-intensive than a simple flashing repair.
Essential Tools and Materials for the Job
Before you begin the repair process, you must gather all the necessary supplies to ensure the job is done correctly and efficiently. You will need a high-quality caulk gun, roofing cement or a specialized polyurethane sealant, a hammer, and galvanized roofing nails. It is also wise to have a stiff wire brush on hand to clean the surfaces before applying any new adhesive. For those working with older homes, you might need a tin snip to trim away jagged edges or a small pry bar to gently lift shingles without causing further damage. Using the correct materials is vital, as improper sealants can fail within months, leading to a repeat of the same problem during the next storm cycle.
Quality matters when it comes to the chemicals and metals you use on your roof. You should consult the National Roofing Contractors Association for recommendations on the best weatherproofing materials available in the current market. Selecting a sealant that remains flexible in both extreme heat and freezing temperatures will prevent the flashing from pulling away again as the house settles. Additionally, ensure your roofing nails are long enough to penetrate the roof deck but not so long that they protrude excessively into the attic space. Having a organized tool belt will also minimize the number of times you need to climb up and down the ladder, which is a major factor in maintaining safety throughout the project.
Establishing Strict Safety Protocols
Safety should always be your primary concern when performing any type of work at an elevated height. Before stepping onto a ladder, ensure it is placed on level ground and secured at the top to prevent sliding. You should wear rubber-soled shoes with excellent grip to maintain traction on the shingles, and never work on a roof that is wet or covered in debris like wet leaves. For steeper pitches, it is highly recommended to use a safety harness and rope system anchored to a secure point. According to the Occupational Safety and Health Administration, falls are the leading cause of injury in home maintenance, so taking these precautions is not optional if you want to work safely.
Communication is another vital aspect of roofing safety that many DIY enthusiasts overlook. Always let someone know you will be on the roof and have them check on you periodically or assist by holding the base of the ladder. Avoid working during peak sun hours in the summer to prevent heat exhaustion, which can lead to dizziness and loss of balance. If you feel uncomfortable with the height or the slope of your roof, it is better to pause the project and seek professional assistance. Maintaining a clear workspace by removing tools you are not currently using will also reduce the risk of tripping, ensuring that your focus remains entirely on the repair task at hand.
Executing the Flashing Repair Process
To begin the actual repair, start by cleaning the area around the loose flashing with your wire brush. You must remove all old, brittle sealant and any accumulated dirt or moss to ensure the new adhesive bonds correctly to the metal and the roofing material. Once the surface is clean and dry, gently push the flashing back into its original position against the vertical surface or the roof deck. If the flashing is warped, you may need to use a hammer to carefully flatten it back into shape. Apply a generous bead of roofing cement or polyurethane sealant behind the flashing before pressing it firmly into place, ensuring that there are no air pockets where water could potentially seep in.
After the sealant is applied, use your galvanized roofing nails to secure the flashing if the original fasteners have failed or are missing. Be careful to nail through the flashing into the solid wood of the roof deck or the mortar joints of a chimney. Do not nail directly into the brick itself, as this can cause the masonry to crack. Once the nails are driven home, cover each nail head with a small dab of sealant to prevent water from entering through the nail hole. This double-layer of protection—both behind and on top of the flashing—is the industry standard for how to repair loose roof flashing safely and effectively in 2026, providing a durable barrier against the elements.
Choosing the Right Sealant for Longevity
Selecting the appropriate sealant is the most important decision you will make during the repair process. While traditional asphalt-based roofing cement is affordable and widely available, modern silicone or polyurethane sealants often offer superior UV resistance and flexibility. These advanced formulas can withstand the constant expansion and contraction of metal flashing without cracking or losing their grip. In 2026, many professionals prefer hybrid sealants that can even be applied to damp surfaces, which is incredibly helpful if you are making an emergency repair during a break in the rain. Always check the manufacturer’s label to ensure the product is compatible with both the metal of your flashing and your specific shingle type.
Preventing Future Flashing Dislodgement
Prevention is just as important as the repair itself when it comes to maintaining a leak-free home. One of the best ways to prevent flashing from becoming loose is to keep your gutters clean and free of debris. When gutters overflow, water can back up under the eaves and put pressure on the flashing transitions, eventually leading to failure. Regularly trimming overhanging tree branches will also reduce the amount of physical impact the roof sustains during windstorms. Branches that rub against the roof can easily snag the edge of a piece of flashing and pull it away from the structure. A quick biannual inspection of these areas will allow you to catch minor issues before they escalate.
Another preventative measure involves checking the integrity of the surrounding shingles and masonry. If the shingles adjacent to the flashing are curling or missing, they cannot provide the necessary support to keep the metal in place. Similarly, if the mortar in your chimney is crumbling, the flashing will lose its anchor point and eventually pull away. Addressing these peripheral issues ensures that your flashing repair remains permanent. In 2026, many homeowners are opting for professional roof coatings that add an extra layer of waterproofing over the entire roof surface, including the flashing. This proactive approach minimizes the chances of leaks and keeps the metal components securely bonded to the roof for many years to come.
Comparing Professional and DIY Repair Costs
Deciding whether to handle a flashing repair yourself or hire a professional often comes down to a balance of cost and complexity. A DIY repair typically costs less than one hundred dollars in materials, whereas a professional roofing contractor might charge several hundred dollars for a service call. However, the value of professional work lies in the warranty and the expertise they bring to complex areas like valleys or multi-layered chimney transitions. Professionals also have access to high-grade industrial materials that may not be available at local hardware stores. If your roof is still under warranty, performing the repair yourself might actually void the coverage, so it is important to check your documentation before starting.
For simple tasks like re-securing a single piece of step flashing or filling a small gap with sealant, the DIY route is usually the most logical choice for a capable homeowner. However, if the loose flashing is part of a larger systemic failure or if there is significant wood rot underneath, the specialized equipment and knowledge of a contractor are indispensable. In 2026, many roofing companies offer “maintenance packages” that include flashing checks and minor repairs for a flat annual fee. This can be a cost-effective way to ensure your roof stays in top condition without you ever having to step onto a ladder. Always weigh the potential risks and the time required against the professional fees to make the best decision for your home.
Key Takeaways
- Always prioritize safety by using a secured ladder and wearing high-traction footwear.
- Clean the repair area thoroughly with a wire brush to ensure sealants bond correctly.
- Use high-quality polyurethane or silicone sealants for better flexibility and UV resistance.
- Apply sealant both behind the flashing and over the heads of any new roofing nails.
- Perform biannual inspections to catch loose flashing before it leads to interior water damage.
- Consider professional help for steep roofs or complex flashing configurations to maintain warranties.
Frequently Asked Questions
What is the best sealant for roof flashing?
In 2026, polyurethane and high-grade silicone sealants are considered the best options because they remain flexible during temperature shifts. Unlike older asphalt-based cements, these materials do not become brittle over time and offer superior resistance to sun damage. They are specifically designed to bond with metal and asphalt shingles simultaneously.
Can I repair roof flashing from the inside?
While you can temporarily stop a leak from the inside using specialized patches, a permanent repair must be done from the exterior. Flashing is designed to shed water on the outside of the structure, so any interior fix is merely a “band-aid” that won’t prevent the wood from rotting. To truly fix the issue, you must secure the metal on the roof surface.
How do I know if my flashing needs to be replaced instead of repaired?
If the metal flashing is severely rusted, has large holes, or has become extremely thin and brittle, it likely needs a full replacement. Small gaps and loose sections can usually be re-secured with nails and sealant, but once the structural integrity of the metal is gone, it can no longer provide a reliable water barrier.
Is it safe to walk on a metal roof to fix flashing?
Walking on a metal roof requires extreme caution as it can be very slippery, even when dry. It is best to use a ladder for access and, if you must walk on the surface, wear soft-soled shoes and step only on the areas supported by the roof batten or decking. For steep metal roofs, professional equipment is always recommended.
How long does a typical flashing repair last?
A well-executed flashing repair using high-quality materials can last between five and ten years. However, the longevity depends on the local climate and the amount of direct sunlight the roof receives. Regular inspections every six months will help you identify when the sealant is beginning to degrade so you can touch it up before it fails.
Conclusion
Taking the time to understand how to repair loose roof flashing safely is an investment that pays dividends in the form of a protected and durable home. By following the 2026 standards for safety and material selection, you can resolve minor issues before they transform into catastrophic structural failures. Whether you choose to perform the work yourself or hire a professional, staying informed about the condition of your roof is the best way to avoid unexpected expenses. Remember that a dry home starts with a secure exterior, and maintaining your flashing is a vital part of that equation.
- Emergency Exterior Wall Stabilization: Immediate Solutions to Prevent Collapse
- How to Dry Wet Fiberglass Insulation Inside Wall Cavities
- DIY Home Maintenance Checklist for Every Season
- Mastering Home Repair Safety: Risk Assessment & Compliance Standards
- How to Troubleshoot a Power Failure in Your Single-Phase Home