Mastering safe ladder positioning techniques for roof access is the most critical skill for any homeowner or contractor performing height-related maintenance tasks. In 2026, safety standards emphasize proactive risk mitigation to prevent falls, which remain a leading cause of residential construction accidents. Proper setup involves more than just leaning a tool against a wall; it requires an understanding of physics, surface stability, and equipment limitations. By adhering to established protocols, you ensure that every ascent is stable and every descent is controlled. This guide explores the nuances of angle calculation, ground preparation, and securing the top of the ladder to provide a comprehensive roadmap for elevated safety. Whether you are cleaning gutters or inspecting shingles, these professional strategies will protect your physical well-being while enhancing your efficiency on the job site. Using the right approach ensures that height-related projects are completed without unnecessary peril or equipment damage.
The Fundamental 4-to-1 Rule for Stability
The foundation of safe ladder positioning techniques for roof access is the 4-to-1 rule, a mathematical standard recommended by safety experts globally. For every four feet of height the ladder reaches, the base should be moved one foot away from the wall. This specific ratio creates a 75.5-degree angle, which provides the optimal balance between stability and load-bearing capacity. If the angle is too steep, the ladder risks tipping backward as you climb; if it is too shallow, the base may slide out from under you. Always measure the vertical height of the contact point rather than the total length of the ladder to ensure your calculations are precise and effective for the specific structure you are working on today.
Implementing this rule in 2026 often involves using digital leveling tools or integrated inclinometers found on modern professional-grade ladders. However, a manual check remains a reliable backup for any technician in the field. You can perform a quick “thumb check” by standing with your toes against the ladder feet and extending your arms straight ahead. If your palms touch the rungs comfortably without leaning, you have likely achieved the correct angle for a safe ascent. This physical verification, combined with the 4-to-1 ratio, minimizes the risk of structural failure or unintended movement during the transition from the ladder to the roof surface. Consistency in this measurement is the first step toward a zero-accident workplace environment.
Preparing the Surface for a Secure Base
Before you even consider leaning your equipment, you must evaluate the ground conditions to ensure a level and firm foundation. Soft soil, loose gravel, or uneven pavement can cause the ladder feet to shift or sink under your weight, leading to a catastrophic loss of balance. Professional contractors often use mud sills—large pieces of plywood placed under the ladder feet—to distribute the weight more evenly on soft terrain. Always clear away debris like wet leaves, ice, or loose rocks that could interfere with the grip of the safety shoes. A stable base is the non-negotiable starting point for all safe ladder positioning techniques for roof access and overall site safety management.
If the ground is sloped, never rely on makeshift shims like bricks or scrap wood to level the ladder. Instead, utilize integrated leg levelers that allow for micro-adjustments on uneven surfaces without compromising the structural integrity of the setup. These devices lock into place and provide a wide footprint that resists slipping on various textures. According to safety guidelines from the National Safety Council, ensuring that both feet have full contact with a solid surface is the primary defense against lateral tipping. Once the base is set, check the stability by applying downward pressure on the bottom rung before you begin your ascent to the roof to ensure everything is locked.
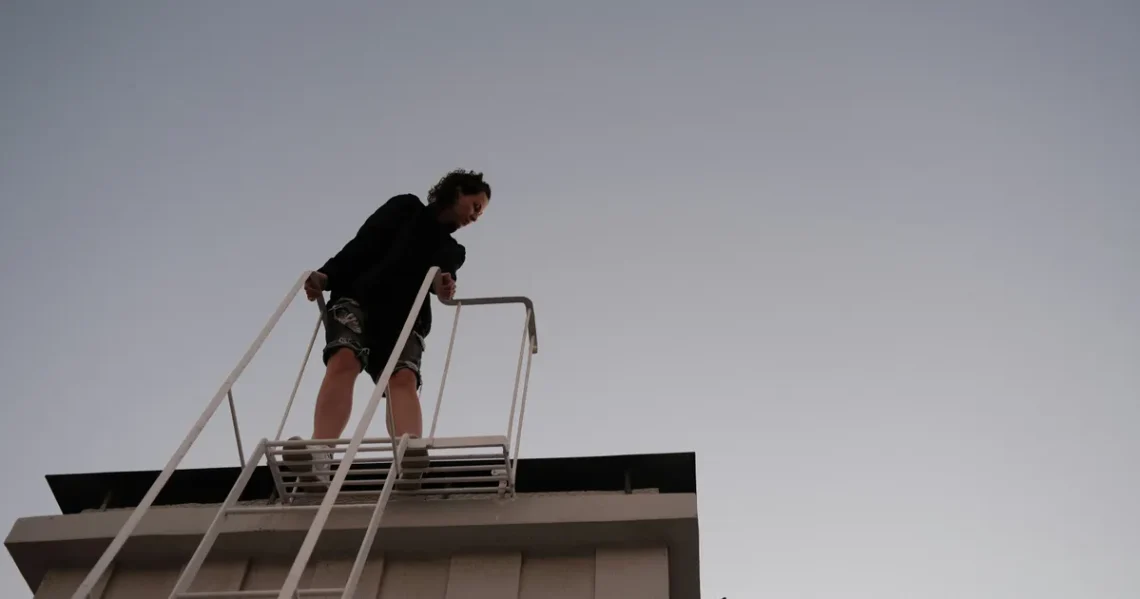
Extending Above the Eave for Transition
A common mistake during roof access is failing to extend the ladder high enough above the gutter or eave line. To facilitate a safe transition, the ladder must extend exactly three feet beyond the roof edge. This extension provides a handhold for the climber, allowing them to maintain the “three points of contact” rule while stepping onto or off the roof surface. Without this extra length, you are forced to crouch or lunge, which shifts your center of gravity and significantly increases the likelihood of a fall. This standard is a pillar of safe ladder positioning techniques for roof access in 2026 and should never be ignored for convenience.
When the ladder extends past the roofline, it also becomes more visible from the ground, serving as a clear reminder of the exit point. However, this extension creates a leverage point that can cause the ladder to slide sideways if it is not secured properly. Using ladder stabilizers or stand-offs can help bridge this gap while protecting the gutters from potential crushing damage. These attachments widen the contact area at the top, providing a much more stable platform for the user. Referencing the Occupational Safety and Health Administration protocols, maintaining that three-foot clearance is essential for preventing the awkward body mechanics that lead to roof-edge accidents and fatalities.
Securing the Top and Bottom of the Ladder
Even a perfectly angled ladder can move if it is not physically secured to the structure. Professionals use heavy-duty bungee cords or specialized ladder ties to anchor the top rungs to a permanent fixture, such as a sturdy rafter or a gutter bracket. This prevents the ladder from “walking” or sliding horizontally as you shift your weight during the transition phase. For long-term projects, some contractors even drive temporary stakes into the ground at the base to prevent the feet from kicking out. These redundant safety measures are what differentiate an amateur setup from a professional-grade execution of safe ladder positioning techniques for roof access in any weather condition.
Another critical aspect of securing the ladder is ensuring the locking mechanisms on extension ladders are fully engaged before climbing. The rung locks must be snapped into place over the rungs of the base section to prevent the upper section from sliding down. Before climbing, visually inspect these locks and give the ladder a firm shake to confirm they are seated correctly. In the high-tech landscape of 2026, many ladders feature visual indicators that turn green when the locks are secure. Regardless of the technology, physical confirmation is the only way to guarantee that the upper section will not collapse while you are mid-climb between floors.
Understanding Ladder Duty Ratings and Loads
Understanding the duty rating of your equipment is a vital component of safe ladder positioning techniques for roof access. Ladders are categorized by their maximum weight capacity, including the person plus all tools and materials being carried. A Type IA ladder, for instance, is rated for 300 pounds, while a Type IAA can handle 375 pounds. Exceeding these limits can cause the rails to flex or the rungs to fail under stress. Always calculate the total weight of your tool belt, shingles, or cleaning equipment before selecting your ladder. Choosing a ladder with a higher capacity than you think you need provides a necessary safety margin for dynamic movements.
| Ladder Type | Duty Rating | Weight Capacity |
|---|---|---|
| Type IAA | Extra Heavy Duty | 375 lbs |
| Type IA | Extra Heavy Duty | 300 lbs |
| Type I | Heavy Duty | 250 lbs |
| Type II | Medium Duty | 225 lbs |
| Type III | Light Duty | 200 lbs |
Distribution of weight is just as important as the total load on the rungs. While climbing, keep your belt buckle between the side rails at all times to maintain a central center of gravity. Overreaching to the side is a leading cause of ladder tip-overs in residential settings. If you cannot reach a specific area of the roof comfortably, the only safe solution is to descend and reposition the ladder entirely. Following the standards set by the American Ladder Institute, you should never stand on the top three rungs of an extension ladder, as this makes the entire setup top-heavy and prone to losing its grip on the eave.
Modern Safety Innovations for 2026 Usage
As we move through 2026, the technology surrounding safe ladder positioning techniques for roof access continues to evolve at a rapid pace. New carbon-fiber materials are making ladders lighter and easier to position without sacrificing structural integrity or durability. Furthermore, smart sensors are now being integrated into ladder feet to provide real-time feedback on surface stability and angle accuracy via smartphone apps. These innovations help eliminate human error, which is the root cause of most falls. By investing in modern equipment, users can benefit from automated safety checks that were previously only available through rigorous manual measurement and constant vigilance on the job site.
The Importance of Three Points of Contact
Maintaining three points of contact is a non-negotiable rule when using any ladder for roof access. This means having either two hands and one foot, or two feet and one hand, firmly planted on the ladder at all times. This technique ensures that if one limb slips, the other two are positioned to support your weight and prevent a fall. Avoid carrying heavy tools in your hands while climbing; instead, use a tool belt or a hoist system to move materials to the roof once you have safely ascended. This simple habit significantly reduces the risk of losing balance during the most vulnerable parts of the climb.
In addition to the hardware, the use of specialized accessories has become standard practice for height safety. Ladder levelers with pivoting feet and aggressive tread patterns allow for secure placement on slick or sloped surfaces. Safety cages and integrated fall-arrest systems are also becoming more common for residential roof access, providing a secondary layer of protection should a slip occur. While the fundamental physics of ladder safety remain the same, these technological advancements provide a more forgiving environment for workers. Embracing these tools ensures that your approach to roof access is aligned with the highest safety standards of the modern era and protects your long-term health.
Key Takeaways
- Always use the 4-to-1 ratio to ensure a safe 75.5-degree angle for the ladder.
- Extend the ladder at least three feet above the roofline for safe transitions.
- Clear the base area of debris and use leg levelers on uneven ground surfaces.
- Tie off the top of the ladder to prevent horizontal sliding or walking.
- Maintain three points of contact at all times during every ascent and descent.
- Never exceed the ladder rated weight capacity including tools and gear.
Frequently Asked Questions
What is the best angle for a ladder leaning against a roof?
The ideal angle is approximately 75.5 degrees, achieved by following the 4-to-1 rule where the base is one foot out for every four feet of vertical height.
Can I use a stepladder to get onto a roof?
No, stepladders are not designed for roof access as they cannot be secured at the top and do not provide the necessary extension above the eave for safety.
How do I stop a ladder from sliding on a deck?
Use rubberized safety shoes or a specialized ladder mat to increase friction, and always secure the base to a fixed point if the surface is slippery.
Is it safe to climb a ladder in high winds?
It is highly dangerous to use a ladder in windy conditions; wait for calm weather to ensure the ladder does not blow over or cause you to lose balance.
How often should I inspect my ladder for damage?
You should perform a visual inspection before every use, looking for cracks, loose bolts, or bent rungs that could compromise the structural integrity of the tool.
Conclusion
Implementing safe ladder positioning techniques for roof access is an essential practice that protects lives and prevents costly accidents on the job. By mastering the 4-to-1 rule, ensuring proper extension above the eave, and utilizing modern leveling technology available in 2026, you can navigate elevated work environments with confidence. Safety is never a matter of luck; it is the result of disciplined preparation and a refusal to take shortcuts. As you apply these professional standards to your next project, remember that a few extra minutes spent securing your equipment can make the difference between a successful job and a life-altering injury.