Performing a garage ceiling support repair for minor sagging is a vital project for homeowners looking to preserve the structural integrity and resale value of their property in 2026. Often, a slight dip in the ceiling is overlooked as a cosmetic issue, but it typically signals that the overhead joists are overstressed or failing due to environmental factors. Identifying these issues early prevents a cascading failure that could damage vehicles or compromise the entire roof structure. This guide provides an expert SEO-driven deep dive into the mechanics of ceiling deflection, offering professional-grade solutions for stabilizing your garage. By understanding the relationship between load-bearing capacity and material fatigue, you can implement a permanent fix that ensures your garage remains a safe, functional space for years to come without the need for a full-scale structural overhaul.
Identifying the Root Causes of Minor Ceiling Sagging
Before initiating any repair, you must understand why the timber is beginning to deflect. In most residential garages, minor sagging is caused by “dead load” issues, such as heavy items stored in the rafters, or “live load” stresses like heavy snowfall. Over decades, wood fibers undergo a process called creep, where constant pressure leads to permanent deformation. Moisture is another significant culprit; if your garage isn’t properly climate-controlled, humidity can soften the wood, making it more susceptible to gravity. You should inspect the attic space above the garage for signs of water intrusion or undersized joists that do not meet the modern standards set by the International Code Council.
In addition to weight and moisture, fastener fatigue often plays a silent role in ceiling failure. If the nails or screws used during original construction have begun to pull away or corrode, the mechanical connection between the joist and the wall plate weakens. This lack of lateral stability allows the joist to rotate or “roll,” which manifests as a visible sag in the drywall surface below. To accurately assess the damage, use a long straightedge or a laser level across the span of the ceiling. A deflection of more than half an inch over a ten-foot span usually indicates that the support system requires immediate reinforcement to prevent the wood from reaching its breaking point and causing a total collapse.
Essential Tools for Structural Support Restoration
Success in repairing a sagging ceiling depends heavily on having the correct mechanical advantage and high-quality materials. You will need a heavy-duty hydraulic bottle jack or a specialized telescoping shoring post to slowly move the joists back into their original horizontal position. Using a “deadman” support—a T-shaped brace made from 2×4 lumber—is a common DIY method, but professional-grade adjustable steel columns provide much more precision. Additionally, ensure you have a high-torque impact driver and structural-grade screws, such as GRK fasteners, which offer superior shear strength compared to standard gold screws or common nails. Accurate measurement tools, including a chalk line and a digital level, are non-negotiable for ensuring the final result is perfectly plumb.
Material selection is equally important when reinforcing the existing framework. If you are “sistering” the joists, you should select kiln-dried lumber that matches the dimensions of your existing ceiling joists, typically 2×6 or 2×8 boards. In 2026, engineered wood products like LVL (Laminated Veneer Lumber) are increasingly popular for repairs because they are perfectly straight and significantly stronger than traditional dimensional lumber. You will also need high-quality construction adhesive to create a monolithic bond between the old and new wood members. This chemical bond, combined with a staggered bolting pattern, ensures that the load is distributed evenly across the repaired section, effectively doubling the load-bearing capacity of the original structure without adding excessive bulk.
Step-by-Step Guide to Repairing Minor Sagging
The repair process begins with a gradual correction of the deflection rather than a sudden force. Attempting to jack a ceiling up all at once can cause significant cracking in the drywall and may even damage the roof rafters above. You should place a thick 4×4 beam across several joists to distribute the pressure from your jack, then raise the ceiling no more than an eighth of an inch per day. This slow movement allows the wood fibers and the house frame to adjust to the new tension without snapping. Once the joists have returned to a level state, you can begin the process of permanent reinforcement by installing sister joists or strongbacks to lock the ceiling in its corrected position.
Safety Precautions Before You Begin
Safety is the most critical component of any structural repair project. Before placing any jacks, you must verify that the floor beneath the jack can support the concentrated load; in most garages, the concrete slab is sufficient, but if you are working over a crawlspace, you may need to add temporary shoring below the floor. Always wear a hard hat and eye protection, as overhead work often dislodges debris, old nails, or insulation. Furthermore, consult the FEMA structural safety guidelines if you live in a high-wind or seismic zone, as your repairs must not only support gravity loads but also provide lateral resistance against environmental forces that could shift the building’s frame during an event.
Follow this systematic approach to ensure a successful garage ceiling support repair for minor sagging:
- Clear all storage items from the rafters and remove any drywall that obscures the damaged joists.
- Identify the lowest point of the sag and mark the adjacent joists to establish a level baseline.
- Position your hydraulic jack on a stable base and use a vertical post to apply upward pressure to a temporary horizontal beam.
- Slowly raise the jack over several days until the joists are aligned with your level line.
- Cut a new piece of lumber to the full length of the existing joist and apply a heavy bead of construction adhesive to the side.
- Clamp the new board to the old one and secure it using a staggered pattern of structural screws every 12 inches.
- Remove the jacks only after the adhesive has fully cured, typically after 24 to 48 hours.
This methodical approach ensures that the repair is integrated into the home’s skeleton rather than just acting as a temporary patch.
Utilizing Sistering Techniques for Maximum Strength
Sistering is the gold standard for garage ceiling support repair for minor sagging because it addresses the root cause of wood fatigue. By “mating” a new, straight board to the side of the sagging one, you create a composite beam that is significantly more rigid than the original. For the best results, the sister joist should span the entire width of the garage, resting on the top plates of the exterior walls. If a full-length board is impossible to install due to space constraints, you can use a partial sister that extends at least three feet past the damaged area on both sides. This overlap ensures that the bending moment is transferred safely into the healthy sections of the original timber.
To maximize the effectiveness of sistering, you must pay close attention to the fastening schedule. Using 1/2-inch carriage bolts with large washers is the most robust method, as it prevents the two boards from sliding against each other under load. If you prefer screws, ensure they are long enough to penetrate at least 75% of the second board without poking through the other side. Experts at This Old House recommend using a zig-zag pattern for fasteners to avoid splitting the wood grain along a single line. This technique not only levels the ceiling but also provides a flat surface for reattaching drywall, making the final aesthetic finish much easier to achieve during the renovation phase.
Assessing Professional vs DIY Repair Needs
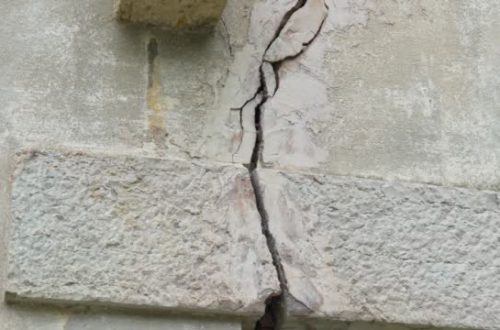
While many minor sags can be handled by a dedicated DIYer, it is crucial to recognize when the damage exceeds basic repair techniques. If you notice that the wall plates are bowing outward or if there are large diagonal cracks in the exterior masonry, the issue may be a foundation problem rather than a simple joist failure. Furthermore, if more than three adjacent joists are sagging significantly, the structural integrity of the entire roof may be at risk. In these scenarios, the tension in the wood is often too high for standard hydraulic jacks, and the risk of a sudden “kick-out” of the support posts becomes a serious safety concern for an untrained individual.
A professional structural engineer can provide a stamped calculation that specifies exactly what size of lumber or steel is required to meet local building codes. This is particularly important in 2026 as building inspections have become more stringent regarding home insurance renewals. If you perform a structural repair without a permit or professional guidance, you may face challenges when trying to sell your home in the future. Professionals also have access to specialized equipment, such as heavy-duty steel flitch plates, which can be sandwiched between boards to provide immense strength in a very slim profile. Investing in an expert evaluation ensures that your minor sagging repair doesn’t turn into a major structural liability down the road.
Preventing Future Ceiling Sagging in Your Garage
Once your garage ceiling support repair for minor sagging is complete, your focus should shift toward long-term prevention. The most effective way to prevent future issues is to manage the weight distribution in your garage attic. Avoid concentrated loads; instead of stacking heavy boxes in one corner, use shelving units that distribute weight toward the perimeter walls where the structure is strongest. Additionally, consider installing a dehumidifier or improved ventilation. In 2026, smart home sensors can monitor humidity levels in your garage and alert you when conditions reach a point where wood rot or fiber softening becomes a risk, allowing you to take action before the wood begins to deflect again.
Regular inspections are the final piece of the prevention puzzle. Every six months, take a few minutes to look across your ceiling with a flashlight, searching for new cracks in the drywall or gaps between the joists and the wall plates. Check your roof for leaks, as even a small drip can saturate a joist over time, leading to significant structural weakening. By maintaining a dry, climate-controlled environment and being mindful of how you use your overhead space, you can ensure that your reinforced ceiling remains perfectly level. These proactive habits, combined with the structural repairs described in this guide, will protect your home’s value and provide peace of mind for your family’s safety.
Key Takeaways
- Address minor sagging immediately to prevent expensive structural failures and safety hazards in the future.
- Use a hydraulic jack to raise the ceiling slowly, typically no more than 1/8 inch per day, to avoid cracking.
- Sistering joists with engineered lumber or kiln-dried wood is the most effective way to reinforce a weak ceiling.
- Always use structural-grade fasteners and construction adhesive to ensure a permanent, high-strength bond.
- Consult a professional if you observe wall bowing, foundation shifts, or if more than three joists are affected.
- Maintain a dry garage environment in 2026 to prevent moisture-induced wood creep and fastener corrosion.
Frequently Asked Questions
How much does it cost to repair a sagging garage ceiling?
For a minor repair involving sistering a few joists, DIY costs typically range from $200 to $500 for materials. Professional repairs for the same scope generally cost between $1,500 and $3,000, depending on labor rates in your area and the accessibility of the joists.
Can I just add more nails to stop the sagging?
No, adding nails will not correct a sag that has already formed in the wood fibers. You must first jack the joist back to a level position and then use structural screws or bolts to secure reinforcement lumber, as nails lack the necessary pull-out resistance for structural leveling.
Is a sagging garage ceiling covered by home insurance?
In 2026, most insurance policies only cover ceiling damage if it is caused by a sudden, accidental event like a falling tree or a storm. Sagging caused by age, wear and tear, or poor maintenance is typically considered a homeowner’s responsibility and is not covered.
How long does a joist sistering repair last?
When performed correctly with high-quality materials and adhesive, a sistered joist repair is considered a permanent fix. It effectively creates a new structural member that should last as long as the rest of the home’s framework, provided the garage remains dry.
What is the difference between a sag and a truss failure?
A sag usually refers to the bending of a single horizontal joist, whereas a truss failure involves the entire triangular framework supporting the roof. Truss issues are much more complex and dangerous, requiring specialized engineering solutions rather than simple sistering techniques.
Conclusion
Successfully completing a garage ceiling support repair for minor sagging requires a blend of patience, the right tools, and an understanding of structural physics. By identifying the causes early and using modern 2026 reinforcement techniques like joist sistering and the use of structural fasteners, you can effectively restore your garage’s safety and appearance. Remember that the key to a lasting repair is a gradual correction of the wood’s shape followed by robust mechanical stabilization. Taking these steps now will safeguard your property, enhance its structural integrity, and provide a stable overhead environment for all your storage and automotive needs.
- Rapid Plumbing Leak Containment: Essential Methods for Your Home
- Property Damage Recovery After Water Exposure: An Essential Planning Guide
- How to Repair Loose Floor Tiles Without Replacing Them
- How to Dry Wet Carpet Fast: Emergency Methods for Indoor Flooding
- How to Fix Flickering Lights During Voltage Fluctuation