Recognizing the signs of ceiling damage early can save homeowners thousands of dollars, considering that over 40% of residential homes will experience a significant ceiling issue requiring professional attention at some point. Understanding effective ceiling damage stabilization techniques for residential buildings is not just about aesthetics; it’s about maintaining structural integrity, ensuring safety, and preserving your property’s value. From minor cracks to sagging sections, addressing these problems promptly prevents escalation, which can lead to more extensive and costly repairs. This comprehensive guide will walk you through identifying, assessing, and stabilizing various types of ceiling damage, equipping you with the knowledge to make informed decisions for your home’s well-being.
Quick Answer: Ceiling damage stabilization involves promptly identifying the cause (e.g., water leak, structural shift), implementing temporary safety measures like shoring, and then applying appropriate repair techniques such as patching, reinforcing, or replacing compromised sections to restore structural integrity and appearance. Professional assessment is crucial for severe or persistent issues.
Identifying the Root Cause of Ceiling Damage
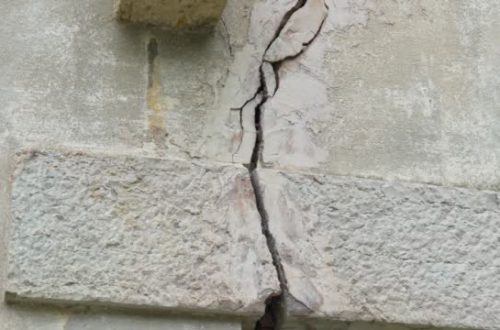
Before any stabilization effort begins, pinpointing the exact cause of ceiling damage is paramount. Superficial cracks might stem from natural house settling, while discoloration or soft spots almost invariably indicate a water leak. It’s essential to investigate the area above the damage, whether it’s an attic, an upper floor bathroom, or the roof itself. Ignoring the source will lead to recurring damage, rendering any repair work futile and potentially exacerbating underlying structural issues over time, making it a critical first step for any homeowner in 2026.
Common culprits include plumbing leaks from bathrooms or kitchens on floors above, roof leaks, inadequate ventilation leading to moisture buildup, and even foundation shifts that stress the building’s frame. Less common but more severe causes can involve pest infestations weakening wooden joists, or improper structural loading. A thorough investigation, sometimes requiring professional inspection, will determine whether the issue is cosmetic, moisture-related, or structural, guiding the subsequent stabilization techniques effectively and preventing further complications.
Implementing Temporary Support and Safety
For significant ceiling damage, especially sagging or bulging areas, immediate temporary support is a non-negotiable safety measure. This involves using adjustable support poles, often called “shoring posts” or “ACRO props,” to bear the weight of the compromised section. These posts should be placed strategically, ideally directly under the damaged area, with a sturdy piece of plywood or a 2×4 lumber between the post and the ceiling to distribute the pressure evenly and prevent further localized damage.
Ensuring the area is safe also means clearing furniture, laying down protective coverings, and if water is involved, shutting off electricity to the affected zone to prevent electrical hazards. For active water leaks, placing buckets or tarps to collect dripping water can minimize further damage to floors and furnishings. These preliminary steps are crucial not only for the safety of occupants but also to prevent the damage from worsening while you assess the full extent of repairs needed or await professional assistance for complex ceiling damage stabilization techniques.
Addressing Water-Damaged Ceilings
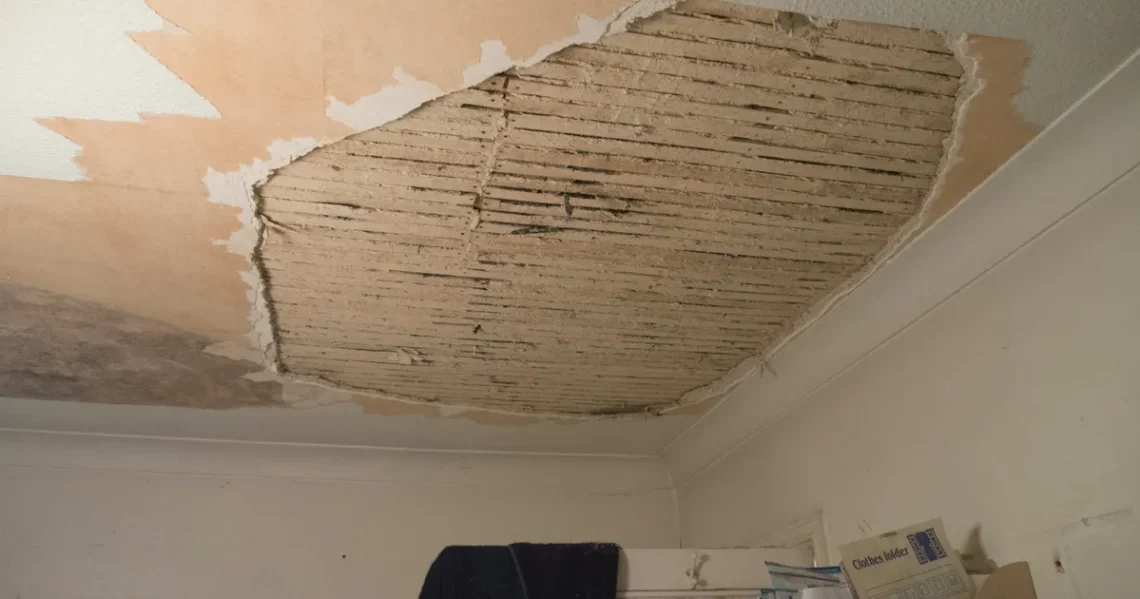
Water damage is one of the most common and destructive forms of ceiling deterioration, manifesting as stains, sagging, or crumbling drywall/plaster. Once the water source is identified and repaired, the affected ceiling material must be dried thoroughly. For minor stains and minimal structural compromise, cleaning and repainting might suffice. However, if the ceiling material is soft, crumbling, or severely discolored, removal and replacement of the damaged section are typically necessary to ensure long-term stability and prevent mold growth.
For localized water damage in drywall, a common technique involves cutting out the affected section, ensuring to cut back to solid joists or framing members. New drywall is then cut to fit, screwed into place, taped, and mudded to blend seamlessly with the existing ceiling. For plaster ceilings, the repair process can be more intricate, often requiring mesh or lath repair before new plaster is applied. Always ensure proper ventilation during and after repairs to aid drying and reduce the risk of future moisture issues.
Mold Remediation Considerations
Water-damaged ceilings, especially those that have remained wet for 24-48 hours, are highly susceptible to mold growth. Visible mold requires careful remediation, as spores can spread and cause health issues. Small areas of mold (less than 10 square feet) can often be handled by homeowners using appropriate personal protective equipment (PPE) and cleaning solutions. However, for larger areas, or if mold is suspected behind walls or in ventilation systems, professional mold remediation services are strongly recommended. The Environmental Protection Agency (EPA) provides comprehensive guidelines on mold cleanup and prevention, which are invaluable resources for homeowners facing such issues. See their guide here: https://www.epa.gov/mold/mold-cleanup-in-your-home.
Repairing Structural Ceiling Issues
Structural ceiling damage, such as significant sagging, large cracks extending across joists, or visible deflection of the ceiling plane, indicates a more serious underlying problem. These issues are often caused by overloaded joists, compromised framing due to rot or pests, or foundation movement. Attempting DIY repairs on structural damage without understanding the cause can be dangerous and worsen the problem. This type of damage requires immediate professional assessment from a structural engineer or a licensed general contractor with structural expertise.
Stabilization techniques for structural issues might involve reinforcing existing joists with sistering (attaching new lumber alongside old), installing new blocking, or even adding support beams. In cases of severe dry rot or pest damage, entire sections of framing might need replacement. Addressing the root cause, such as reinforcing a weak floor above or diverting water away from the foundation, is critical for a lasting repair. These complex tasks require specialized knowledge and equipment, emphasizing the importance of expert consultation for residential ceiling damage stabilization in 2026.
Professional Intervention vs. DIY Approaches
Deciding whether to tackle ceiling damage yourself or call in professionals depends largely on the cause, extent, and your own skill level. Minor cosmetic issues like hairline cracks or small water stains with a known and resolved source are often manageable DIY projects. These typically involve basic patching, sanding, and painting. There are many reliable resources, like those found on reputable home improvement sites, that can guide you through these simpler repairs effectively. For instance, Bob Vila offers practical advice on various home repair topics: https://www.bobvila.com/articles/ceiling-repair/.
However, for any damage involving active leaks, significant sagging, large holes, persistent mold growth, or suspected structural compromise, professional intervention is highly recommended. A licensed plumber can fix leaks, a mold remediation specialist can safely remove extensive mold, and a structural engineer or general contractor can assess and repair structural weaknesses. Investing in professional help for complex issues ensures safety, prevents further damage, and provides peace of mind that the repair is done correctly and durably, adhering to modern building codes and best practices for ceiling damage stabilization.
Key Takeaways
- Always identify and fix the root cause of ceiling damage before attempting any repairs.
- Implement temporary safety measures like shoring posts for sagging or unstable ceilings immediately.
- Water-damaged ceilings require thorough drying and often material replacement to prevent mold and ensure stability.
- Structural ceiling issues demand professional assessment and repair to guarantee long-term safety and integrity.
Frequently Asked Questions
What are the first steps if I notice my ceiling sagging?
If you notice your ceiling sagging, the very first steps are to evacuate the area if the sagging is severe, then immediately implement temporary support using adjustable shoring posts. Next, try to identify the cause, such as a water leak from above or structural compromise, and contact a professional for an urgent assessment to determine the appropriate stabilization techniques.
Can I paint over water stains on my ceiling?
You can paint over water stains on your ceiling, but only after the source of the water leak has been completely resolved and the ceiling is thoroughly dry. Use a high-quality, oil-based stain-blocking primer first to prevent the stain from bleeding through the new paint. Painting directly over an active leak or damp surface will result in the stain reappearing and potentially causing further damage.
When should I call a professional for ceiling damage?
You should call a professional for ceiling damage if you suspect a structural issue (large cracks, significant sagging), have an active or persistent water leak, extensive mold growth, or if the damage is beyond your DIY capabilities. A professional can accurately diagnose the problem, ensure safety, and perform a lasting repair using appropriate ceiling damage stabilization techniques.
How long do ceiling stabilization repairs typically take?
The duration of ceiling stabilization repairs varies significantly based on the type and extent of the damage. Minor repairs like patching small holes or cracks might take a few hours to a day. More extensive water damage repairs, including drying and multiple coats of mud and paint, could take several days. Structural repairs, which might involve framing and inspections, could extend to weeks, depending on the complexity of the project.
Conclusion
Effectively addressing ceiling damage is crucial for maintaining the safety, structural integrity, and aesthetic appeal of your home. By understanding the various ceiling damage stabilization techniques, from identifying the root cause to knowing when to seek professional help, homeowners can protect their investment. Proactive measures and timely repairs in 2026 will prevent minor issues from escalating into major structural concerns. Remember, a stable ceiling is a cornerstone of a secure and comfortable living environment, ensuring peace of mind for you and your family.
- Prevent Hazards: Essential Techniques for Safe Home Maintenance
- Quickly Diagnose & Safely Fix Residential Electrical Faults
- Urgent Electrical Repairs: Mastering Safety & Compliance
- How to Clean Concrete Floors After a Sewage Backup: A Step-by-Step Guide
- Best Tools Every DIY Home Repair Beginner Should Own